About Me

My photo
An attempt (albeit probably a foolish attempt) to document my way through learning new crafts, sharing my love of crafts i have already learned and generally just a housewife wittering on about the 3rd love of her life.....Crafts!

Tuesday, 30 April 2013

My Chicken Pot Pie

I make my pie in a cast iron flat pan kind of like a paella pan but deeper but you can make the filling in a sauce pan and transfer it to a pie dish. Im just lazy about washing up and like to make as little as possible (although after a baking spree my husband would be inclined to disagree with that claim)
 
This is a really simple dish which is why my kids love it, its not complicated or full of a thousand ingredients.
 
The quantities you use for this pie depend greatly on the size of the pie you want to make. My pie dish (paella pan) is about 16 inches in diameter, and about 4 inches deep so the quantities below are designed for that pan. to make a smaller pie simply reduce the quantities across all of the ingredients.
 
I used:
2 large packs of chicken thighs approx 1.1kg each bone in skin on.
4-5 thick rashers of bacon
approx 1 tbsp plain flour
3 chicken stock cubes
boiling water
1 pack pre made puff pastry (i never make my own puff pastry its just too damned time consuming!)
salt
pepper
chopped sage or other herb of your choice.
 
Yes that really is all you need!
  • Put the chicken thighs in a large pot.
  • Crumble over stock cubes, cover to 1cm above meat with boiling water.
  • Bring to the boil.
  • Turn the heat down slightly and simmer for around 45 mins or until the chicken thighs are cooked through.
  • Remove the chicken thighs from the stock and retain the liquid.
  • Allow to cool and remove the skin and bones from the meat, set the chicken meat aside.
  • Cut up the bacon into strips, In a frying pan, or in my case in the Paella dish saute the bacon in a little olive oil until browned slightly.
  • add the flour and cook on a medium heat, stirring all the time for approx 2 mins til the flour absorbs the fat in the pan.
  • Using a ladle add a little of the retained stock at a time to the flour mixture until a thick-ish sauce has been created. Stir continuously to avoid lumps.
  • Add the chicken to the sauce.
  • Roll out the pastry on a floured board
  • Put the chicken and bacon mixture into your pie dish
  • Put the rolled out pastry over the top, crimp, stab a hole in the centre to allow steam out during cooking.
  • Cook on gas mark 6 until the pastry is brown and risen (approx 20 mins)
  •  
  •  


My 'Whip it up quickly' Chocolate Cake

Occasionally I need to whip up a cake at short notice and as I am not one to present people with a cake that does anything other than make them salivate on viewing it, I tend to have this on standby.
 
8oz Unsalted Butter or Margerine (I use stork)
8oz Caster Sugar
4 Medium Eggs (or in my case 2 medium eggs and 3 bantam eggs)
 
Please note that bantam eggs are like rocking horse poo (virtually impossible to aquire) unless you know someone who keeps bantams or you keep them yourself, If you are lucky enough to fall into one of the latter two categories, when baking I follow the rule of thumb that 3 bantams eggs is equvalent to 2 medium eggs and so far it has not failed me.
 
7oz self raising flour
1oz really good cocoa (I use green and blacks but you can use whatever brand you like)
1 tbsp of milk
1tsp of instant disolved in 1 tbsp of hot water
1/2 tsp vanilla bean paste (or something else vanilla-esque eg essence)
1 tub of betty crocker vanilla fudge frosting
 
My method uses a free standing mixer but I will write the instructions as though by hand because I am aware that not everyone is lucky enough to have one or bakes enough to justify the expanse of buying one.
Prepare 2x 8inch sandwich tins and preheat the oven at gas mark 5 or equivalent temp
  • Cream together the sugar and butter til it is light and fluffy (this can take a while and an electric hand whisk can be your friend here).
  •  
  • Add the eggs and 1 tbsp of the flour and whisk until fully combined (the flour stops the mixture curdling which can effect the rise of the finished cake).
  •  
  • Add the disolved instant coffee and vanilla bean paste.
  •  
  • Sift the remaining flour and cocoa powder together into the wet mix and combine using a folding action (please google this if you arent sure as its important to keep the air inside the cake and avoid over working the flour.
  •  
  • When the mixture is fully combined, divide between the sandwich tins and level the mixture using a spatula.
  •  
  • Bake for approx 25-35 mins (this depends greatly on your oven) to check if the sponge is cooked insert a skewer (i use a bamboo one) into the centre of the cake and if it comes out clean the cake is cooked. If you dont have a skewer press the top of the sponge gently with a clean finger and if it springs back it is cooked, if it gives slightly it needs to go back in the oven. If your cake is not cooked return it to the oven for 4-5 mins then check again (it can go from uncooked to over done in less than 5 mins)
  •  
  • Allow to cool in the tins for around 10 mins, then turn them out onto a wire cooling rack, it is important to have them on a rack like this because it allows the air to circulate under the cake allowing for even cooling and avoiding a steam build up within the cake which can effect the final product.

  • When the cakes are cooled fully smear a little of the frosting onto the surface of your plate or cake stand to stop your cake sliding off. put the least pretty cake on the bottom with the top facing up. smear with the frosting and pop the second cake on top in the same way. Top with the frosting and decorate to suit you. I used fresh strawberrys with mine but you can use anything you like. A cadburys flake crumbled up or some malteasers dotted around the edge might be nice... or both! Whatever its up to you, have fun with it! If its fun to make then it will be fun to eat!


Paul Hollywoods Savoury Couronne

I initially saw this on Paul Hollywoods T.V. Programme 'Bread' and it immediately sparked my interest...
 
I love a challenge even when it poses what would appear to be impossible technical issues. Most would say I'm ambitious, I would say I'm bloody stupid!
 
So I set about making this couronne despite the fact that Mr Hollywood has stated both in his T.V. programme and the accompanying book (yes I had to have it) that this recipe is for the advanced baker.
I have only had successful loaves of bread in the last month or so having finally mastered the art so would hardly call myself an advanced baker but sod it here I go!
 
I cant keep calling Mr Hollywood by that name it takes too long to type.
(May I call you Paul? Yes? Cool!)
 
O.K. so I opened the book at the relevant page which I have found is always a good place to start...
I ran down the list of ingredients and made sure that I had everything I needed having bought supplies the previous day. I opened the fridge to discover that my darling husband had eaten more than half of one of the packs of parma ham 'because I wanted ham' (you can imagine the language that spewed forth from my mouth dear reader, I confess it was not pretty or lady like and I may have promised physical damage to his person.)
 
So i collected together the remaining  parma ham, the mozarella, strong white bread flour and other ingredients and set to work.
 
The recipe for the brioche base of this bread is actually quite simple to make and I quickly got to the stage of the first rise, I popped it into a lightly oiled tupperware tub and got on with the other recipes I'm going to be featuring shortly. An hour later I faced what can only be described as a baptism of fire.
 
I should have taken photo's at each stage but to be honest I didn't want to get dough on my camera!
 
I popped the risen bread dough onto a lightly floured work surface (what is lightly floured anyway? whenever I 'lightly flour' something everything sticks to it and I end up getting both annoyed and extremely messy!) rolled it out into something resembling a rectangle and (get me I'm flash) tacked the side nearest me to the work surface (this is basically squishing the edge of the dough into the worktop so that it doesnt wiggle around like a loony while you are trying to work with it).
 
I laid what was left of the parma ham onto the dough, tore up the mozarella (feeling all mama mia about myself and tossing it at the dough with what I thought was flare but what was actually me looking a total wally) I then stepped outside...
 
No I wasnt running away from it, I was on the hunt for some basil that wasnt dead or dying because it turns out that my green fingers arent actually green they are septic. Herb hunt over, I scattered the paltry few leaves I had managed to find that didnt look too pitiful over the dough, grated on some parmesan and looked at it with something akin to dread...This is it...The bit i saw on the T.V. and thought to myself 'I can do that...' It doesn't look so easy now...
 
Deep breath!
 
I rolled the dough towards myself enclosing the ham, cheese and basil within...
 
I gently rolled the 'sausage' stretching it slightly as I went to achieve the correct length...
 
Cut the 'sausage' lengthways down the middle AAAAARRRRRGGGGGGHHHHHH why am I so tense?????
 
Turned the half 'sausages' upwards so that the filling was facing the ceiling...
 
Grasped each end in my hands firmly and...
 
 
WAIT! This is NOT going to work!!!
 
(To myself) Get a grip woman its only bread dough, its not going to bite you!
 
So in the end instead of doing the ultra flash ultra cool Paul Hollywood flick of the wrist and spin the dough through the air to achieve the twist, what I actually did was gently (ever so gently, pathetically gently in fact) hold the ends together at one end and turn it as quickly as I could while praying that the filling stays in place, and then twist at the opposite end in the opposite direction...
 
I did it! well it looks sort of like Paul's (he did say I can call him that, see above) couronne and thats good enough for me. Now I have to get it on the baking sheet to prove and I panic...
 
How the hell am I going to move that without it falling to bits?
 
I know...(rummage in the cupboards) I have a steel thingy I use for moving sponge cakes, no idea what its called but it looks kind of like a wonky guillotine blade. I slide the wonky guillotine under the bread and lift it up while sliding the baking tray underneath (this is no mean feat people, I should have had a standing ovation for this but alas I got none)
 
Set aside to prove for approx 1 hour...
 
Bake at 200 degree's (oh bugger whats 200 degrees in gas mark again?... gets out android phone and looks up gas mark temp conversions... wait one site says gas mark 7, another says gas mark 6....Check my Delia Smith book for the conversion table in the front (thank you mum!!!!).....Grrrrr Delia says 7, O.K. lets go with that.
 
(This temperature debate was going on about half an hour previously to my putting the bread in the oven because as we all know Preheat Preheat Preheat!!)
 
Popped the bread in the oven and forced myself to walk away...
 
The resulting loaf looks like this...
 
Please note: DO NOT try to take this off the baking sheet before it has cooled for a while or you will be convinced you have a dreaded 'soggy bottom' when in fact its the cheese making an escape. I'd suggest waiting for around 15 mins before you move it to the cooling rack.
What a clever girl I am!
HaHa!


Thursday, 25 April 2013

Feed The Neighbours Too Soup

My own recipe so for that reason I have no reservations in sharing the full list on ingredients and not worrying about plagiarism!
 
 
This is basically a 'Souped up' (get it?) Version of my family favourite butternut squash and chorizo soup which is very much what it says it is:
 butternut squash, chorizo sausage and onion sautee'd in olive oil. vegetable or chicken stock cook until squash is tender, attack it with a hand blender (or in my house wizzy wizzy thing) until smooth, add smoked paprika and season with salt and pepper to taste. 
Wait! you are getting 2 recipes for the price of one here!
 
Anyway...
Feed The Neighbours Too Soup Contains....
1 Large butternut squash (deseeded and chopped into cubes approx 1 inch in size, rough guide here no need to get the ruler out)
175g asparagus chopped into 1 inch bits (the only reason its that quantity is that is the amount that was in the packet i bought in sainsburys)
2 chorizo rings (either mild or picante-hot, choose whatever suits your palette) chopped into 1/2 inch bits
2 large white onions chopped roughly
600g cherry tomatoes (again its what i had in my fridge so use as a rough guide)
260g spinach (the amount that was in a pack from sainsburys)
1 large-ish sweet potato chopped into 1 inch pieces
1 tbsp garlic puree or equivalent of chopped garlic
3 heaped tsps of harissa paste
5 chicken stock cubes
3 heaped tsps smoked paprika
salt and pepper to taste
gallons of water (no i mean it if you cook in my quantities you will need approx 10 pints of water)
 
 chuck the veg and chorizo (not the spinach) into a mahoosive stock pot (mine is pretty big but you can reduce quantities to suit your equipment)
with a good glug (accurate measurments as you can see) of olive oil, dont use extra virgin olive oil unless its all you have in the cupboard, its more expensive than basic olive oil and you dont taste any difference in the finished product so why spend the extra pennies?
Sautee the veg and chorizo for about 10 mins and add the garlic and harrissa.
Sautee for another few mins then add the stock cubes and water.
Turn the heat up and bring to the boil. Moderate the heat to a simmer and leave it alone for about 45 mins. (check its not bubbling over now and then)
When the vegetables are tender add the smoked paprika and attack it with the wizzy wizzy hand blender thingy until its smooth. throw the pack of spinach at it and wizzy wizzy one more time. stir it well to make sure you have no lumps of anything hiding at the bottom of the pot and season to taste.
 
I know you see chefs on tv going on and on about seasoning your food properly but believe me it is vital. Taste the soup as you season because you can always add more seasoning but you cant take it away!
Butter a couple of rounds of lovely crusty bread (you might want to try the white cob loaf recipe from Stacey Stewarts book, I like to replace half the flour with wholemeal flour for flavour but do whatever suits you) and tuck in! I'm off to eat mine now... Happy cooking!


Lemon and White Chocolate Muffins

Lemon and white chocolate muffins
 
From Jo Wheatley's book 'Home Baking'
 
 
I was having a nose through the cook books at our local supermarket (if my husband loses me he always checks where the cook books are first) for inspiration for a new blog when I came across Jo Wheatley's 'Home Baking and surreptiously slipped it into the shopping trolley hoping my husband wouldnt see it and launch into another long whinge about the amount of cook books I have. ( Its not that many honestly!!!!) Can I just say in my defence he does not whinge when he is eating the resulting food....
 
In fact I can see him in the kitchen as I type eyeing up the muffins still warm on the cooling rack! Anyway i digress... Book got spotted, whinge ensued and as many people who know us will testify usually happens a bit of a comical bickering match took place which ended in me feigning a serious strop while he collapsed with laughter at the till.... We are really very entertaining and I'm sure the cashiers dont forget us for a while!
O.K. back to the muffins, I picked up the book this morning looking for something I can make for my sons when they come home from school. I don't even get a 'hello mum' before they start asking for something to eat... 'Mummmmmmmm is there something to eat???' If the answer is no then 'Owwwwwwwwwwwwwwww you are ruining my life and starving me!!!!' (I'm shaking my head in dismay as I type this with a half grin on my face because I have the mental image) My children are obviously starved....(uh huh sureeeeeeeee)
 
My trusty old mixing bowl collection complete with measuring cups i dont use because i use my stainless steel ones (but they were so pretty i had to have them) and my flour shaker which was a charity shop find!
 
 
Anyway to combat the usual fridge raiding ruffians appetites i found the recipe for lemon and white chocolate muffins. Now one of my sons is autistic and very very fussy but if i dont tell him there is lemon in it (lemon is fruit and therefore the devil as far as he is concerned) i am hoping that he will only notice the white chocolate and eat them anyway.
Im not kidding this kid can spot a finely chopped herb or citrus fruit zest at 100 paces!
The recipe couldnt be simpler, dry ingredients into a bowl, wet ingredients into a jug whisk wet ingredients, mix dry ingredients, mix the two and voila!
 
I found this set of scales in sainsburys, a steal at £15!
 
Sooooo, here are the bits I struggled with.......90g of unsalted butter melted......yeah but do I need to cool it before I add it to the egg because surely that will start cooking it, thus rendering it incapable of doing its job in the cake (i think its enriching and binding but who the hell knows? - actually I do im just being facetious hehe)
Secondly add the lemon zest and lemon juice to a mix containing milk? Oh hell to the no! Seriously? Ummmm K....
I will give you a tip dear reader if you embark on making this recipe, get everything weighed out in advance because the only way to do the jug of wet ingredients is damned quickly and get it in with the dry ingredients as fast as your lil arms can get a mixing. Or if you are like me and have a food mixer as fast as your food mixer can mix it......which lets face it is pretty darn fast.
 
Lemon and White Chocolate Muffins
 
I cooked them on the mid to low shelf in the oven, I probably could have done with putting them a little bit higher to get a more golden brown top and maybe even a better rise but, here they are in all thier glory, my first attempt at lemon and white chocolate muffins!


Sunday, 21 April 2013

Cot Tidy For Mini Me!


As a parent i can testify to the fact that when you have a child of any age mess is an inevitable part of the package. Mum's the world over fight a daily battle to keep organisation or at least some semblance of it in hand.
I am an avid crafter and in one of my craft magazines i came across a pattern for a cot tidy and while the particular pattern they used didnt appeal to me the idea did. I know you can buy these in such places as mother care etc but they are costly and rarely fit things you actually need within the pockets. So I set about making a cot tidy that would suit my particular needs.
 
Firstly I thought about what we need to have to hand during the night for feeds, nappy changes and so on, i broke it down to the essentials which for us are these:
Nappies
Wipes
Barrier cream (nappy rash cream)
Bottles
 
O.K. So four essential pockets.....
 
I measured the end of the cot and decided how big each pocket should be by simply putting a pack of baby wipes on top of my fabric and using that as a guide for that pocket and well you get the picture...
 
O.K. Mini me has a nautical themed cot so i wanted to stick with this theme while keeping the colours bright and simple. I chose navy blue, white, red, and light blue as my main colours and set about what would end up becoming something of a mission for me.
 
Hemming the backing fabric

Fighting with the sewing machine, it won!

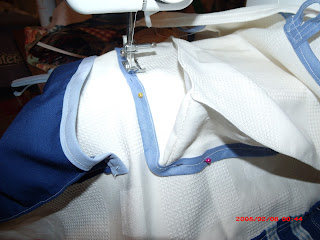
Choose your design and pin the peices in place on the pocket, after trimming the top with bias binding or hemming.

I used a zig zag stitch around the edges of the applique but you can hem the peices individually if you arent as lazy as me...

I wanted this pocket to fit a pack of baby wipes so i made is as deep as a full pack. Sewing the corners twice to make them strong and snipping off the excess fabric inside....
Note this is my second attempt because i did it the wrong way around the first time and had to unpick it...D'oh!
 
Inside the corners

Red bias binding to go around the edges (Bias binding is a good way to neaten up rough edges if hemming isnt your forte)

Stitching the pocket into place on the backing fabric

Close up... Me getting flash with the camera

Next pocket... I decided a life saver would be good here as not only does it go with the nautical theme but there are times during a 4am feed that I could do with saving!
 
 
Pleated pocket
Hem the sides with a running stitch (I double folded mine to avoid rough edges) 
 

Add on the applique and pin in place while you zig zag sew or hem them into place

Trim the top with bias binding to hide rough edges or hem as with the sides

Pleat the bottom (but not the top or you wont get anything into the pockets)

Trim with bias binding ( i also stitched down the pleats to add definition but this isnt essential)

Golden rule to sewing: Iron Iron Iron!!!!!
 
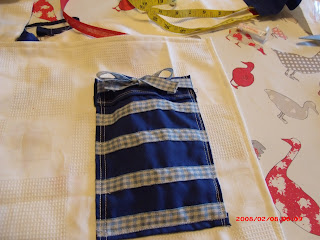
Simple pocket with ribbon sewn on in running stitch then hemmed before sewing onto backing fabric in a running stitch

Another pocket that requires corners...this time i got it right first time!

More bias binding across the top and around the sides

Make a button loop by stitching some bias binding together and attaching to the pocket with a running stitch

Attach to the backing fabric in the same way
 

This is what it looks like at this point arent I clever!!

I embellished the last pocket with my sons name and a few buttons i had hanging around (Its a good job home made upcycled chic was the look i was going for because there is nothing professionally made about this!)


The finished article (yes i know I need to change the time and date on my camera I just havent figured out how yet!)
 
I enjoyed making this and I hope that it lasts the test of time and my sons can use it for their children and tell them their nanna made it! Awwwwww


Friday, 19 April 2013

New Book!


While in Tesco this week i picked up a copy of Paul Hollywood's 'How To Bake'. Through watching many many many cooking programmes on T.V. I know that his methods often vary from those of other bakers such as his slow proving method when baking bread. Mr Hollywood has waxed lyrical on numerous occasions about the benfits of this method and how it improves the flavour of the finished loaf. So I figured I would give his book a go...
 
My first impressions on picking this up are the monotone photography which in many cases could prove boring but in this case i have to admit it works. I am normally an advocate of photographs full of colour and interesting staging but Paul Hollywoods book uses simpler staging to good effect. Secondly there is the content in the first few pages, Paul Hollywood does something not many other chefs have bothered to do. He clearly and concisely lays out information on each basic ingredient in bread, explains what it does, why its needed and the effect on the finished products dependant on the quantities each ingredient is used. He then goes on to give clear and simple descriptions of the main flours used in baking today, what they are made of, their protien content, what this protien content means to the finished article and why the protien content is important. Until reading this (and remember this is the first few pages of the book) I was utterly clueless as to the science behind baking. I knew that formulas had to be followed but i had no idea why. I am certain that while I go on to test out recipes from this book over the next few weeks that I will find a new clarity in my baking. Simple things like explaining that stone ground flour is better because stones produce less heat during the grinding process than mechanical ones and by doing so preserve more nutrients in the grain.... Before this i just thought stone ground meant ' I'm a posher flour so buy me!' Simple explainations like this bring clarity to the mind of the home baker and dispell so many myths and clear up many questions you didnt even know you had. Well done Mr Hollywood on suprising someone who has read many hundreds of recipe books over the years within the first few pages.
Stand by for recipe testing results to follow. 

Monday, 15 April 2013

East Street Market and Beyond


Looking back on my childhood I am forced to make comparisons between that and the childhood I hope I am providing for my children.
London today is very different to the London I knew as a child, while there was always the element of criminality around (and no i dont mean the romanticised versions of gangsters and organised crime, I mean as it actually was. Guy Ritchie has alot to answer for in the romanticism of gang life) we always felt safe enough playing in the street and in many cases going to the local shops for our parents on errands. I think about the area now and I would rather gouge my own eyes out with a rusty spoon than allow my 9 year old to walk the distance to the shops that I thought nothing of at his age.
 
Dont read me wrong, we couldnt leave our doors open (someone would have run off with the telly) or leave the car unlocked. It wasnt a rare occurrance for 'Joe Bloggs' to arrive at his car in the morning with the intention of going to work only to find his wheels missing and his car propped up on bricks. Burglarys were common place and no one ever bought anything expensive just in case some bugger broke in and nicked it. Arson was a favourite among local teens especially the cavernous communal bin sheds at the ends of the blocks which were pretty good if you fancied a good blaze. If you saw someone running it was rarely to catch a bus and usually was closely followed by someone shouting 'Stop! Police!' but to us it was just another day on the estate. Despite all that we looked after our own, children were watched by entire communities of parents not just the ones they belonged to and most adults locally were known as Auntie or Uncle, a sign of respect from the children.
We didnt run barefoot in the streets as depicted by so many authors when writing about children in London because by the 80's Fila and LA Gear were all the rage, not to mention bat wing dresses, ra ra skirts and sheep skin coats (cringe, thanks mum love you!) Remember the fashion for M.C. Hammer style 'Genie' trousers? Backside hanging around the knees? Oh my oh my....
Anyway I digress, yes growing up in London was rough but it was also fun, where else can you hitch a ride for part of your journey to school on the back of a market barrow? Where else can you earn pocket money helping out on the stalls? At the age of 12 I was earning £20 a weekend helping out on various stalls shouting 'Paaahhhnd a bunch any bunch!' and 'Strawbreeeee's luvverly stawbreeeee's!!! Come on darlin only a pahhnd a punnit' (I type phonetically for effect here).
I ask you dear reader, where else can you take three steps and at the first step be listening to the dulcet tones of Gregory Issaccs and be surrounded by the smells of Jerk chicken and by the third have your senses assaulted by the range of coloured lace and ribbons and literally thousands of buttons in tubes racked up like bottles of vintage wine on the haberdashery stall?
Please note this picture above is now my personal idea of heaven!
I didnt know it at the time but looking back i cant help but feel nostalgic for the place I once called home, I will never live there again but I visit often and when I do its like a home coming every time.
I often wonder if the diversity I was exposed to in my childhood is the reason I am so accepting of differences in people now, it worries me that I am depriving my children of that same open minded outlook on life, then I get a grip and remember how stubborn I am and that it is up to me to provide that education in diversity for my children. I now live in a fairly rural part of North Wales and I can let my children do all the things i did as a child like play in the street (although i have to admit to not allowing them past the garden gate without an adult in tow) and having a real childhood swinging off of climbing frames (yes i foresee many broken bones) but that is what being a child is about. Children adapt to the circumstances they are given to deal with and my childhood differs so much from that of my children that it is easy to make negative comparisons but the fact remains...
 

I didnt turn out so bad!


Sunday, 14 April 2013

A Side Note


I have also made a granary loaf which was the same recipe as the white loaf only with different flour... I'd love to say its because i was being experimental but I'd be lying, its because i ran out of white bread flour and made a last minute substitution.
 
 
One adapts to circumstance dont you know! 

Fun With Hokey Pokey


You put your left arm in.......... O.K. so its not that kind of hokey but its pretty fun none the less.
 
Take 3 parts caster sugar to 1 part golden syrup, heat in a pan til it resembles molten lava. Amber in colour and oh so lovely looking that the temptation to poke your finger in 200 degree farenheight sugar is almost impossible to resist.
 
Here's the fun part!
 
Warn everyone to stand back and arm yourself with a whisk and have a greased baking tray handy because time my dear is of the essence here.
 
Throw in some bicarbonate of soda (refer to various recipes for amounts) whisk like a woman demented and get it all out of the pan onto the baking sheet before it billows over the edges of the pan like a scalding hot cloud of sugar.
 
Now the temptation here will be to stick your finger in it...
 
DO NOT Stick your finger, thumb or anyother protruding appendage into this mixture!!!
 
Lest you leave layers of skin behind and really enjoy spending time in a burns unit, the nurses are lovely but personally i could do with out the pain.
 
I warn you, as soon as the bicarbonate of soda hits the hot sugar and you start whisking it will literally go mental. Ever see the episode of 'The Big Bang theory' where Sheldon plays a prank that involves foam falling from the ceiling of another characters lab? It is kind of like this only on a smaller scale and more likely to blister.
 
HOWEVER besides all the dangerous practices it takes to get to the finished article it is well worth the effort. Here's one i made earlier! (I have always wanted to say that!!!!!)  

Oh and because everything tastes better smothered in chocolate.... I couldnt resist!

Marshmallow Mayhem


It occurred to me while making these that i could possibly be declared insane, I have a tendency to take on 'experiments' just to see if I can do it.
 
Put 6 sheets of gelatine into the bowl with 4 fluid ounces of ice cold water....O.K. check done that. In a saucepan put granulated sugar, liquid glucose....Wait WOAH! How much Glucose???? 350g?? Are you sure? Read it again...
Yep it sure does read 350g of liquid glucose.....Note to self: monitor childrens intake of said marshmallows or impending hyperactivity is the order of the day. O.K. done that. Add a pinch of salt...SALT??? Ummm ok if the recipe says salt lets stick with it... and 4 more fluid ounces of water (If its going in the saucepan to be heated im guessing it doesnt matter if its ice cold this time).
 
Heat for 4 mins with the lid on the pan...Oh hell now i have to find the lid.... Put the brakes on, i have to now get on my hands and knees and dig around in the back of my pots n pans cupboard to find the illusive pan lid...
 
Pan lid located!! At last!! (I actually thought i had thrown it away during one of my mad organisation moments).
 
O.K. so ive now heated the sugar mixture for 4 mins with the lid on, now what?? Bring to the boil with the lid off and using a sugar thermometer bring it to 240 degrees farenheight (I dont know how to type the degrees symbol, dont laugh).
 
Luckily i recently purchased a sugar themometer but for those of you who dont have one apparantly 8 mins on medium heat should be sufficient.
 
Fast forward to the moment I had been looking forward to like a child waiting for christmas (yes i am that sad). Time to add the sugar to the gelatine and watch it puff up and become all white and glossy and and and oh....its going to take 15 mins to get like that....anticlimax!!!
 
 
After whisking, setting dusting in cornflour and icing sugar mixed in equal parts the result is this:
I thoroughly enjoyed making these and i am sure we will all enjoy eating them, although im pretty certain that the eating will take significantly less time than the making!
 
Note: There simply is NO tidy way of making these, prepare yourself for residing within an ash cloud of icing sugar and corn flour and having your fingers stick to literally everything for an hour or two afterwards...
My recipe was again found in Stacie Stewarts book 'Stacie Bakes' Stand by for fun with Hokey Pokey!


OH NO!! Cake Disaster!


While my eventual success at baking a loaf of bread has given me great pleasure i have now had my first EVER cake disaster!!!!
 
I had a feeling as i put it in the tin that it might be a little too much mixture for the tin but told myself i was being silly and the same recipe worked out just fine the other day......
Oh how wrong can you be!
 
My chocolate cake is now a molten lava type mush! I think i might cry...
It rose beautifully and i took it out of the oven quite confident in my prowess as an amateur baker. Left it for ten minutes before turning it out of the tin only to have it ooze piping hot cake mixture down my hand... mortification guaranteed.
 
I feel that in future i will be listening to that little voice in my head that whispers 'this is not going to work' in future, oh dear i feel very very silly.
 
maybe i can cover it with custard and call it something entirely different... the children will never know.
 
This is a mistake that will NOT be repeated! 

Saturday, 13 April 2013

The Great Escape


Having recently built a larger run at the top of the garden to house my growing flock of poultry, I have since discovered that chickens are extremely adept at helping to find places I over looked in the process of building.
 
For 4 days now i have looked out of my living room window to find Agnes looking back at me with her head slightly cocked to one side with an expression that can only read 'if you're going to build it do it right woman!'
 
This chicken can only be described as a chick with attitude, she escapes on a tri-daily basis and i am completely stumped as to how on earth she is doing it! Surely she could put houdini to shame? In fact i am considering changing her name!
 
When we named her the series Mrs Browns Boys was newly on the tv and i enjoyed watching it so much that i felt the character of Mrs Brown should be immortalised in chicken form. I had no idea how very apt i was being in choosing this particular chicken to bare the name. Mrs Brown is famously funny, fierce and reminds me of my late maternal grandmother in so many ways, this made the tv series all the more funny for me and Agnes the chicken has continued with the hilarity.
 
If there is trouble to be had she is guaranteed to be at the centre of it. Most people think im mad when i say that chickens have personalities much like cats and dogs and other pets of 'normal' description and personally i found it hard to believe before i had chickens as pets.
But believe me when I say I am not insane or 'the mad chicken lady' ... well maybe i am but the fact remains that chickens do indeed have little personalities of their own.
On close observation of my little brood i have discovered that Red our Rhode Island Red Cockrel is no more in charge of the flock than I am. Agnes rules supreme and is quite happy to let us know on a regular basis.
 
Ha! thought you had me didnt you? is an expression i face on a daily basis and while it is often frustrating in the extreme it is also highly entertaining. Agnes and i will continue to battle on for matriarchal power and it stands to reason that i will invariably lose but i think that Agnes enjoys these small spats almost as much as i do!


My opponent! 

Tales from the chicken coop


First let me introduce the ladies (and gentleman)
 
Agnes is the alpha hen, she is the 'Maggie Thatcher' (controversial i know) of our little flock and rules with an iron wing.

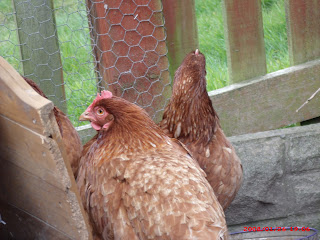
She is featured here with our other two Red Shavers, Mrs B and Florence demonstrating exactly what she thinks of my David Bailey impression with the camera.
Florence

Mrs B getting her feathers back after her first moult (until i kept chickens i didnt know they did this and accused the farmer of trying to sell me duff birds!!!)
 
Red is our lovely boy (although the peck scars on my husbands hands say differently) who loves women and children but seems to dislike his domain being invaded by grown men
Red as a 3 week old chick

Red as he is now attempting to rule the roost although Agnes has other ideas!
 
Moving along to Snowdrop our White rock hybrid who is a pullet and approximately 20 weeks old like her counterparts Bluebell and Cinders.
Cinders and Bluebell

Snowdrop
Now you have been introduced to our large breeds there are just 4 more little ones to introduce. Our Bantams
Wiggle aged 3 weeks
 

Wiggle and Star aged 3 weeks and OMG were they cute!!!!!

Wiggle grew into a lovely young lady!

Star featured with her friend and confidant Hearty

Matilda wanting to know why i dared to approach her run without a handful of corn

Group shot with Matilda photo bombing Hearty and Star!
 
Ok so now you have met our Chickens i should also introduce our quackers
Rosy with her mate Jim (now sadly deceased)

Daisy (now deceased) with Nikki
Our two khaki campbell girls have had a hell of a winter, we lost the three other members of our duck family to the severe winter despite taking numerous precaution and in Jims case going as far as to administer antibiotics daily via injection (vet taught me) and having him get better only to die suddenly a month later. Keeping poultry is at times as heart breaking as it is rewarding. I get so attached to my birds and losing any one of them is a blow.
I started life living in South East London on a council estate and while in many ways i still view that as home, i never really fitted in there. for reasons which i wont go into i found myself living in North Wales with young children and believe it or not an almost paralysing fear of birds.
My Son Ethan has Autistic Spectrum Disorder and for his 7th Birthday he gave me the terrifying revelation that he wanted to keep chickens and could he have some as a birthday present please and thank you very much.... AAARRRGGGHHHH!!!!!!
With trepidation and my husband along side to do the actual handling of the dreaded birds i reluctantly agreed to buy 5 red shavers from a farmer which were year olds and just coming out of first moult (even if i did say they looked decidedly oven ready and made a fool of myself accusing the farmer of trying to sell us duff or diseased birds....(blush) )
We set up our first house and run and i avoided contact with them as much as possible. One day I decided 'this is stupid its about time i tried at least' So first i stroked one while my hubby held it to stop it flapping, next i picked one up and held it at arms length... and so on.
I have to say it must have worked because we now own no less than 7 breeds of chicken and 2 ducks and i deal with them daily. in fact i positively love my chooky cuddles. If we had more room i would love to have more chickens but my neighbours are patient with me and i dont want to rock the boat (eggs as bribery works i have found) Maybe some day i will achieve my dream and have a small holding for my birds instead of a back garden which they have taken over. I have my eye on a few other breeds and would love to one day maybe get into showing my girls. but alas that is in the future as along with my brood of chooks i also have a husband, 4 sons, 2 step children (at intervals) 2 cats a dog and a rabbit to take care of. I am so lucky to have such a chilled out landlord!!!!!
I hope to update this blog regularly with tales from the coop i hope i dont bore too many people with it!!!! Thanks Liz x