About Me

My photo
An attempt (albeit probably a foolish attempt) to document my way through learning new crafts, sharing my love of crafts i have already learned and generally just a housewife wittering on about the 3rd love of her life.....Crafts!

Wednesday, 4 September 2013

Vikki sponge cake

I named my vanilla sponge with clotted cream and strawberry jam filling after my little sister, firstly because she has spent most of her life having to tell people her name isnt victoria its vikki, secondly because she is one of the most inspirational people I know! And thirdly because she is beautiful much like this cake! (even if I do say so myself!) So little sis this one is named in honour of you!

Start with my basic sponge recipe of equal amounts butter, caster sugar and flour and 4 eggs per 8oz of flour, (depending on egg size) this is based on medium eggs.

For this size cake I used 1lb of each or equvialent conversion (im old fashioned)
And I used half a dozen large eggs.

Cream together the butter and sugar, I mean really give it some welly, the aim here is to get the butter and sugar to lighten in colour and become light and fluffy as we beat air into it, add some good vanilla extract, dont use essence its all chemicals!!! Or use vanilla bean paste, 2 tsps of either one is fine. Mix it into the butter/ sugar mixture. Add your eggs and a tablespoon of the flour, the flour at this stage stops the mixture splitting. Add the remaining flour and a quarter cup of milk and mix well. Dont be tempted to over mix though because this will aggitate the gluten in the flour and your cake will be all spring no sponge! No one wants a cake to twang!
Seperate the mixture between two prepared sandwich tins and bake on gas mark 5 for approx 30 mins, depending on your oven, check with a skewer if it comes out of the middle of the cakr clean its done, if not pop it back for 5 mins and check again, keep doing this until you are satisfied that your cake is cooked.
Leave to cool in the tins for 15 mins then turn out onto cooling racks, allow to cool thoroughly, turn one cake upside down on a serving plate and slather in jam and clotted cream (devon or cornwall your choice) pop the top on, sift over with icing sugar for no reason other than it looks pretty, top with strawberries and serve!!

Try to save some for others though ;) x

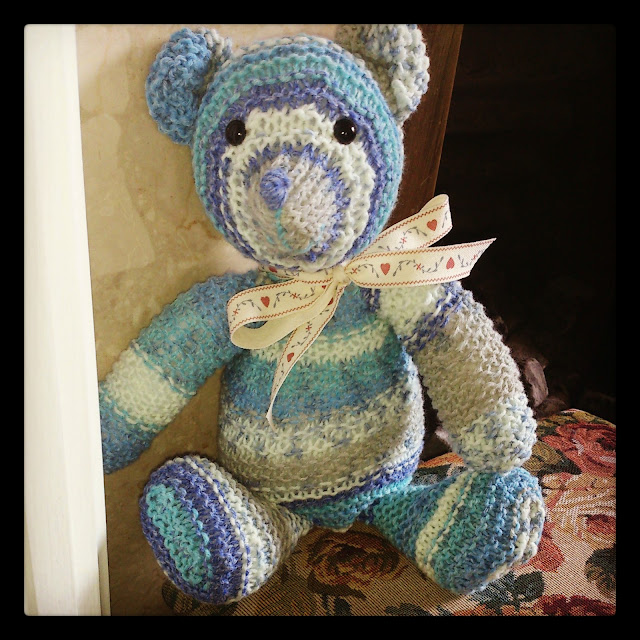
Bertie bear

I love to knit and while browsing the newsagents shelves for new knitting magazines a pattern caught my eye, it was in a free supplement in Let's Knit magazine called Christmas gift knits, advertised as 8 quick and easy patterns for the whole family!
I simply fell in love with the bear on the cover of the supplement. I decided I must knit him!

I looked through my yarn stash and decided on a Sirdar crofters wool in various shades of blue and set to work. The pattern was simple to follow and my project grew rapidly, bertie bear as I decided to call him was coming to life!

I decided that because of the varying shades of blue in bertie's tummy that to knit the accompanying waistcoat would cover him up too much and I struggled to really decide what colour to make it that wouldnt drown out his mottled appearance. So I just left it out and gave him a dapper little bow made from east of india ribbon instead. Bertie is now much loved and drooled upon by my 8 month old son! Bless good old Bertie!

Little sister's wedding

When my little sister announced that she was getting married I was obviously more than a little excited!
 
I offered to help in any way I could, and my sister darling that she is asked if I would mind making some bunting.
 
NOW
 
My sister probably didn't expect me to go to quite the lengths I did in order to make this bunting just a tad special but it was for my only sister so I went the extra mile.
 
I went online and got the dimensions of the hall they were using for the meal and worked out how much bunting would be needed to fit it perfectly.
 
The room had steel struts (builders of the world unite in correcting me in the terminology but for the purposes of this they are struts!) so I counted them, worked out (as best I could) the approximate length of said struts, multiplied that by the amount of said struts and got on ebay...........
 
No not to buy the bunting!!!!!!
 
I bought tons of bias binding and some fabric that I knew my sister would love. When the fabric arrived I poked around in my scrap fabric stash and came up with more than enough fabric.
 
I cut the flags and because I was in extra mile mode decided to trim each one with bias binding so that they were all neat and tidy with no rough edges and looked just that little bit more classy than a pinked edge (crafters know ok they just know!)
 
I am not ashamed to say that this took weeks, as I was doing some and leaving it when I was seeing bias binding in my sleep.
 
Also in my wisdom I decided that I'd take care of the confetti situation...........To be fair I did see a picture on pinterest which totally inspired me and I got all excited and possibly bulldozed my sister into agreeing but................confetti cones it is!
 
Meanwhile.....
 
The bunting flags look suspiciously like a stack of thongs.


I ordered some card for the confetti cones, swore a few times when it was a completely different shade to that described and ordered another lot of card.
 
When it arrived I drew around the dish that sits on my scales cut the rounds into thirds (as accurately as I could eyeball it) glued paper doilies to the outside with my fantastic new discovery the glue mouse! Glued them into cone shapes, trimmed rough edges, stuck little polka dotted satin bows to he front and sat back quite pleased with myself.
 
I filled them with a mixture of Asahi rose petals (dried) lavender, jasmine and pink heather. All chosen for specific reasons. Roses because they are beautiful and smell gorgeous, lavender for the scent, jasmine because when my sister was growing up she always wanted to be Princess Jasmine from the Disney film Aladin and Heather for luck.
 
The finished result wasn't bad at all :D
 
I got a much loved (code for a bit battered) white basket, wrapped ribbon around the handle and glued tiny rose buds around the rim. put wadding in the bottom and tucked some lovely fabric over and around the wadding to provide a cushion to sit the confetti cones on to prevent spillages and packed everything away for transportation to the wedding venue.
 
I finally finished the bunting by attaching the flags to long lengths of bias binding (for that finishing touch and professional look) and to prevent it looking like knickers on a washing line as my younger brother so kindly put it I added tiny lengths of polka dotted ribbon between the flags. I was quite pleased with the finished result!


Oh my cod! Filleting salmon is a load of pollocks!

Firstly let me apologise for the disasterous pun's in the title of this post, my only excuse is that filleting this behemoth was so stressful it addled my mind!
 
My best friend Angela looked at me agog when I informed her that I was going to fillet the whole salmon.
 
 (mainly because when it came to cooking it I discovered that despite all my best laid plans it didn't fit in my oven..................)
 
 But I took on the task with gusto.....
 
for the first 5 minutes.
 
 
Picture this, I am stood looking at what can only be described as a gargantuan fish sat on my little Gino DiCampo butchers block, which until this moment I had thought was of a fair size as chopping boards go. Mr Fish is looking at me with accusing eyes and there is me mulling over where to start.
And if I'm honest looking more than a little bewildered.
 
'Right Liz think..........'
 
'How did Rick Stein do this? '
 
The head!!!! The head comes off first!!
 
So I gently lift the gills so that I can find the optimum point at which to decapitate the beast and then...............the blighter bit me! Ok so I may have been in control of the very dead fish at this point but I refuse to take responsibility for my finger brushing its mouth which I now can reliably state is lined by blinkin' sharp gnashers! It drew blood!!!
In return for this onerous deed I decided to chop its head off with a little more gusto than was really necessary but revenge is sweet!
 
Might I add that my best friend is still observing this minor battle with more than a touch of amusement in her eyes (which I chose to ignore).
 
Our fishy friend is now looking like Marie Antoinette post guillotine and im feeling very pleased with myself that I managed to do it without losing any significant amount of fish flesh or my own fingers.
 
I mentally call upon the inspirational musings of Mr Stein and pray to that God of the cockle that he guide me in my endeavours. I remove the fins (which is more difficult than it sounds). I'm a reasonably intelligent woman but I found it a little suprising that the fishes fins are attached to the body by a joint. Retrospectively I have no idea why this was such a surprise because anatomy isn't something I'm particularly bad at but I digress, it was a shock at the time.
I sharpened my knives, ran my filleting knife (or the only knife in my kitchen that looks anything like a filleting knife) down the back of the spine and started to gently prise the flesh from the rib cage.
 
Salmon are slippery little suckers!!!!!!!
 
Fast forward to both fillets being removed amidst a shameful amount of swearing and one or two open threats of bodily damage to an already dead fish and voila!!!!! two lovely-ish looking salmon fillets complete with 'oh cod' bones...........................
 
Now I am one of those ultra organised (hahahahahahahaha!!) mothers who has everything in her handbag ready for any eventuality, not because everything gets thrown randomly in there and if it cant be found anywhere else it will be in mums bag, honest! So I delve into the depths of the bag looking for tweezers.
 
Aha!!! Now the inside of my handbag smells suspiciously like a fishmongers because I stupidly didn't wash my hands before delving into the bag but who cares? I found the tweezers!!
 
An hour and several bouts of bad language later...........
 
I give up! If there are any more bones in that bloody thing its tough!
 
Lined the inside of my largest baking tray with parchment paper backed with foil (its brilliant stuff you can buy it in Sainsbury's) threw some black pepper and a sliced lemon over the now decidedly ragged looking salmon fillets topped with more of aforementioned paper/foil and shoved into the fridge til the following day when it was needed.
 
Cooked it in the bottom of the oven on gas mark 3 for an hour, while we all went to church, no I'm not joking this was part of the catering for my sons christening!! when we got back the salmon was cooked perfectly, soft and flaky and I got lots of compliments about it so I forgave the salmon for biting me!
 
This is an adventure that while I am glad I embarked upon it, I will not be repeating the journey............................. Mr Fishmonger is my new best friend.